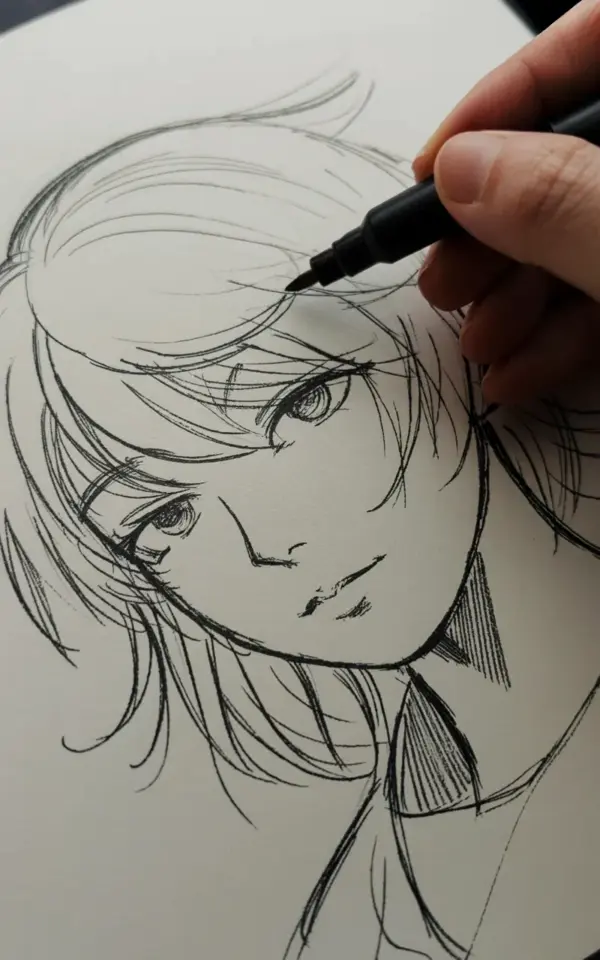
Look at the marker tip hovering right above those pencil lines. In one second it will touch the paper, and the anime hair drawing before and after will flip from loose and sketchy to bold and definite. This is the exact moment I want to talk about. That transition is where most people give up too early, they stop after graphite or panic once ink is down because you can’t erase it.
The photo shows a hand, a black marker, and a whole head of hair made of sweeping graphite strokes. The paper is off-white and textured, catching the light in a way that makes every line visible. The marker tip sits at the top of the frame, just about to commit. Honestly, I’ve been in this moment a hundred times, and it still makes my stomach jump.
Graphite pencil sketch: getting the flow right
Before any marker ever touches the page, the pencil does the heavy lifting. In this sketch, the hair lines curve outward like wind caught in the strands. They don’t look like individual hairs, they look like big, confident shapes moving in one direction. That’s the whole trick. Anime hair works when you draw the mass of the hair, not the tiny strands.
Start with a light pencil, maybe 2H or HB, and draw the outer silhouette first. Then add a few internal lines to suggest where the hair splits into clumps. Don’t press hard. You need those lines to stay visible but easy to cover, because ink will glide right over them and then they’re gone.
Here’s the thing: the pencil sketch in this photo is already good. The curves have rhythm, the top has volume, the ends taper off naturally. If you’re stuck on your own hair drawing, look at how the pencil strokes wrap around an invisible skull. That’s what gives manga hair its bounce.
Why marker ink changes the whole energy
A graphite sketch says “maybe.” Marker ink says “this is exactly how it is.” That’s why the before and after feels so dramatic. The same line, once traced in black, suddenly looks like it came out of a printed manga page.
Not gonna lie, ink is scary. One wrong stroke and you’re either adapting or starting over. But look at this photo again. The marker is following the pencil line, not perfectly, but with purpose. You don’t need to trace every single graphite mark. You just need to pick the strongest lines and commit to them.
I’ve ruined plenty of sketches by inking every little pencil stroke. It gets muddy fast. Choose the outer edges, choose the main clump separations, and leave the internal details alone. That’s how you keep that clean anime hair look.
The in-between: when pencil and ink work together
This photo is the rare moment where both materials exist on the page at once. You can see the untouched graphite still sitting under the sweeps, and then the marker line cutting through it like a bold outline. That mix is genuinely useful for practice.
Set up your own split screen. Draw two identical hair sketches on one page. Ink only one of them. Leave the other as pencil. Then compare. The inked one will pop, the pencil one will fade into the paper texture. That’s not a bad thing. Both are valid, but they read completely differently. I keep a page like this in my sketchbook to remind myself that ink isn’t just coloring inside the lines, it’s making a choice.
Also, the texture in the photo matters. That off-white paper has some tooth to it. When you drag a marker across that kind of surface, it catches slightly and the line gets a tiny wobble. That wobble looks human. You lose it on super smooth paper.
How to read the before and after in this drawing
Let’s break down exactly what changed. Before: the hair looks airy, light, like it could blow away. After: the marker lines lock the shape into place. The volume stays, but it’s now solid. That’s the whole appeal of watching an anime hair drawing go from rough graphite to crisp marker lines. You’re literally watching a design become confident.
The sweeping lines in the photo curve upward and then cascade down. The marker tip is visible at the top, meaning the artist is starting from the crown of the head. That’s a good order to follow. Always ink from the top down so your hand doesn’t smear fresh marker over already inked sections.
One thing I notice is the line weight. The outer edges are thicker, while the inner flow lines are lighter. That contrast is what makes the hair feel layered. If everything is the same thickness, it flattens out. So when you’re inking, vary your pressure. Press a little harder on the silhouette, ease off on the strands inside.
What this close-up teaches about line weight
Speaking of line weight, look at where the marker stroke is next to the pencil stroke. They don’t perfectly align. The marker line hugs the pencil line, sometimes touching, sometimes drifting a hair’s width away. That tiny offset is fine. It creates a warm, hand-drawn feel.
If you want to practice this specific skill, do fifteen minutes of ink-over-pencil drills. Draw a simple curve in pencil, then ink it without trying to match it exactly. Speed up. Slow down. The goal is to build trust between your eye and your hand. I still do this when I’m feeling rusty, which honestly is more often than I like to admit.
And here’s a weird detail. I have a tiny dent on the side of my middle finger from holding pens too hard. When I photograph my own hand mid-inking, that dent is always visible. It reminds me that this is a physical skill, not just a digital thing. Kind of funny how a close-up photo exposes your personal drawing habits.
Turn this into a sketchbook habit
If you want to improve your anime hair drawing, don’t wait for inspiration. Make a tiny ritual out of it. Pick one photo reference or one pose, sketch it in pencil, ink it with a marker, and date the page. That’s it. Three minutes of setup, maybe ten minutes of drawing.
– Use a black fineliner or brush pen, nothing fancy. A 0.5 or 0.8 tip works best for hair.
– Keep the pencil sketch super light, just enough for you to see the hair direction.
– Ink the outer shape first, then add the internal clump lines.
– Don’t shade with the marker. Let the lines carry the movement.
– Take a photo right at the halfway point, before the ink covers all the pencil. That before and after shot is gold for tracking your progress.
You’ll notice improvement fast, like within a week, because hair strokes are repetitive. Your hand will learn the rhythm. And those little snapshot photos you take? They become a cool visual log of your entire month of drawing.
Honestly, the best part about this whole process is the satisfaction of looking at a finished inked head of hair that started as scribbly graphite. It never gets old. The jump between rough sketch and clean ink is addictive in the best way.
So next time you’re sitting with a sketchbook and a marker, take a moment before you start. Notice how the pencil looks soft and tentative. Then make the first black stroke. That’s where the magic sits, in the sixty seconds where you decide to commit. Save this one for your next sketchbook session, and maybe snap a photo of your own in-between state. You might surprise yourself.
Leave a Comment