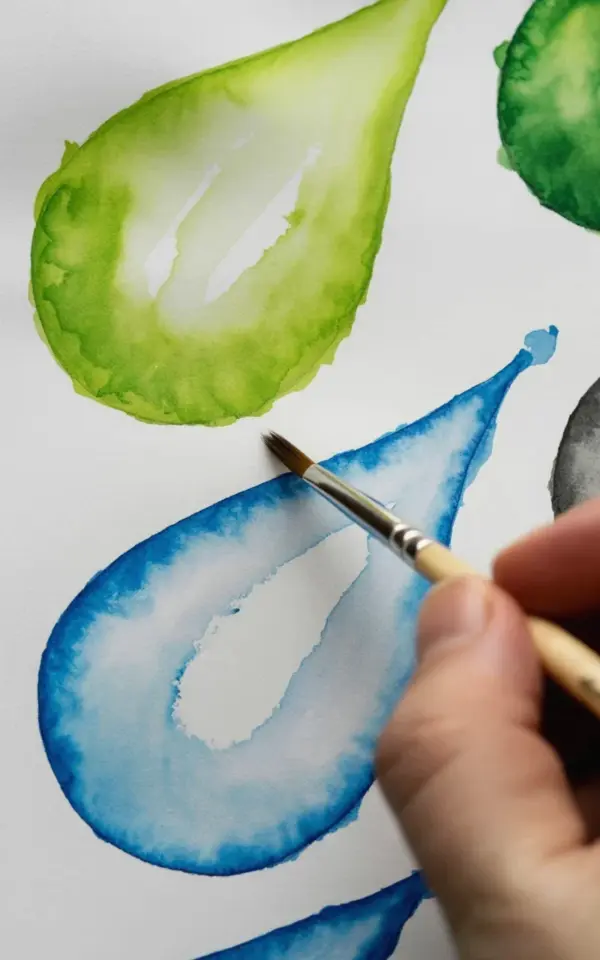
There is a close-up photo that sums up this watercolor droplet tutorial on a budget: a fine brush with a light handle touches a light blue dewdrop while a loose lime green droplet sits above it. You only need two colors and one brush to paint easy dewdrops, even if you have never picked up watercolors before. This guide walks through both styles seen in the photo, the textured green and the smooth blue, so you can learn the core moves.
What You Need: Budget Watercolor Supplies for Beginners
You do not need a fancy set or expensive paper. The image shows a single fine brush, and that is honestly enough. A fine brush, often called a liner or detail brush, creates the small pointed shapes that make a droplet look convincing.
For paint, choose a lime green and a light blue. These are the exact colors in the photo. If you only have a basic pan set, you can mix a little yellow with green to make lime, and a touch of gray or more water with blue to lighten it. That works perfectly.
Use any watercolor paper you have. Even thick printer paper can work for practicing, though real watercolor paper holds the paint better. A small jar of clean water and a paper towel are the only other essentials.
Setting Up Your Watercolor Palette for Mixing Greens and Blues
Start by placing small dabs of your two colors on a plate or a palette. The green should be bright and energetic, just like the top droplet in the photo. The blue should feel calm and soft, like a winter morning sky.
Add water slowly to each color. For the green, keep it fairly concentrated so the loose brushstrokes have visible texture. For the blue, thin it out a little more to achieve that smooth, even coloring. The key is to test each mixture on a scrap piece of paper before touching your main painting surface.
Remember that watercolor dries lighter than it looks when wet. Make your mixtures slightly deeper than you think they should be. That small tip saves many beginners from ending up with faded droplets.
How to Paint the Loose Green Droplet Using Textured Strokes
The green droplet in the photo has loose, textured brushstrokes. It sits at the top with a soft, organic feel. To recreate this, load your fine brush with the green paint and do not overwork the water. You want the bristles to hold a decent amount of pigment.
Touch the brush to the paper and press down gently. Move it in short, irregular strokes that follow the outline of a teardrop shape. Avoid trying to make it perfect. The charm of this style comes from those raw, uneven marks that still read clearly as a droplet.
Let the texture show. You might see tiny gaps or lighter patches within the shape. That is exactly what you want. In the photo, the green droplet looks alive because the brushstrokes are visible and varied. Keep your hand relaxed and let the brush bounce slightly across the surface.
How to Paint the Smooth Blue Droplet with Defined Edges
The blue droplet at the bottom of the photo is the opposite of the green one. It has more defined edges and smoother coloring. Your brush should be slightly wetter for this technique, and you need to work with more control.
Start by outlining the droplet shape with the tip of your fine brush. Use light pressure and a steady hand. Think of drawing a tiny egg with a pointed tail. Once the outline is there, fill it in with even, slow strokes that overlap just a little.
Keep the brush moving while the paint is wet. This prevents hard lines from forming inside the shape. The goal is a flat, uniform color that looks almost like a sticker. The photo shows the brush touching the blue droplet, which is a great reminder to guide the paint gently rather than pressing hard.
Fine Brush Control for Watercolor Dewdrops: Grip, Pressure, and Angle
Holding the brush correctly changes everything. Position your fingers about halfway up the handle, not too close to the metal part. This gives you more balance and a natural range of motion. The light-colored handle in the photo suggests a slim, lightweight brush that allows for delicate handling.
Use the side of the brush for broad strokes and the very tip for details. For the green droplet, drag the side of the brush to create texture. For the blue droplet, use the tip to keep the edges crisp. Varying your pressure is the secret to moving between these two styles.
Try making a few practice marks on a scrap piece of paper. Press lightly for a thin line, then press gradually harder to see how the line thickens. This simple exercise builds the muscle memory you need for painting believable dewdrops. Your hand should feel like it is floating, not gripping.
Watercolor Dewdrop Practice Ideas for Building Confidence
Once you have painted one green and one blue droplet, try these variations to improve your skills:
- Paint a tiny drop of water into a wet blue shape to create a natural highlight.
- Use only your fingertip to smudge a dry green droplet for a soft, misty effect.
- Stack three small droplets in a row, alternating loose and smooth styles.
- Add a faint shadow below each droplet to make it pop off the paper.
- Mix your green and blue together on the paper to see how they blend.
Each exercise takes less than two minutes. The more you repeat these simple shapes, the faster your hand learns the rhythm. You do not need to finish a whole painting every time. Just playing with the brush is enough to improve.
Common Watercolor Droplet Mistakes Beginners Make and How to Fix Them
One common issue is using too much water, which causes the droplet to spread into a shapeless blob. If that happens, dry your brush on a paper towel and gently lift away the excess paint. You can also let it dry completely and paint a new droplet on top.
Another mistake is pressing too hard with the fine brush, creating thick, clumsy lines. Instead, let the brush just kiss the paper. The photo shows such a light touch on the blue droplet, which is why it looks so smooth and refined.
Many beginners also worry about perfection. Loose droplets are meant to look organic, so do not judge your work against a photograph. Compare your green droplet to the textured one in the image and give yourself credit for the movement and character. Every attempt teaches your hand something new.
Painting dewdrops with watercolor is one of the most forgiving exercises for a beginner. This watercolor droplet tutorial on a budget has shown you two distinct approaches using the same fine brush and two colors. The lime green droplet celebrates texture and looseness, while the light blue droplet rewards patience and steady control.
Now it is your turn. Gather a fine brush, a little green and blue paint, and a scrap of watercolor paper. Try both styles, then invent your own combinations. Save this tutorial for your next creative session and keep painting those easy dewdrops.
Leave a Comment