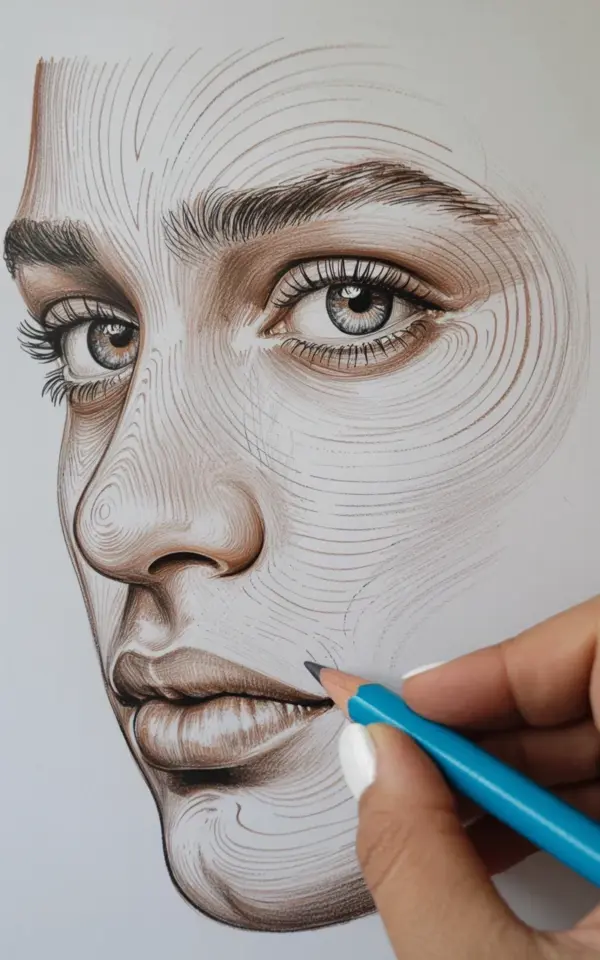
Starting with Affordable Tools: The Light Blue Mechanical Pencil
If you are anything like me, you probably love the look of a detailed pencil drawing progress but hesitate because of the cost. That portrait transformation with swirling wood-grain texture lines? You can absolutely do it without breaking the bank. The hand in the photo is holding a light blue mechanical pencil, and that is exactly the kind of tool I reach for when I want precision without spending a fortune. A basic mechanical pencil from the drugstore costs around two to three dollars and gives you a consistent fine line that regular wooden pencils sometimes struggle to deliver. I have been using the same one for months, and it still works perfectly for all my texture drawing experiments.
For the drawing process shown here, the light blue color is just a personal preference, but any mechanical pencil that takes 0.5 or 0.7 mm lead will do the job. The important part is that the lead stays sharp so you can create those fine, swirling wood-grain texture lines without having to stop and sharpen every two minutes. Trust me, that is a huge time saver and keeps your portrait drawing flow going smoothly.
Building the Swirling Wood-Grain Texture Without Expensive Supplies
The spiral pattern across the face in this piece looks complex, but you can achieve it with just a few budget-friendly drawing tools. I use a standard set of graphite pencils, ranging from 2H to 6B, which costs about the same as a decent lunch. The key is to practice the motion on scrap paper first. Swirling wood-grain texture lines are basically curved strokes layered on top of each other, starting light and getting darker as you go. You do not need fancy blending stumps or tortillons; a tissue or even your finger can soften the transitions if you want a smoother effect.
Here is a quick list of supplies that keep this drawing process cheap but effective:
- Mechanical pencil (0.5 or 0.7 mm) for fine, consistent lines.
- A few graphite pencils (a hard H and a softer B are enough).
- Regular printer paper or sketch paper (no need for expensive brands).
- Tissue or cotton swab for blending (free from home).
- Kneaded eraser (one dollar each, lasts for months).
With these simple items, you can build abstract patterns that gradually take over the portrait. The texture drawing in the photo uses light and dark areas to create depth, and you can mimic that by varying the pressure on your pencil. No need for a studio setup, just a table and good natural light.
Focusing on the Eye: Budget Techniques for Realistic Detail
The intense eye in this drawing is what grounds the whole piece. Notice the detailed eyelashes and the realistic iris that stand out even as swirling lines start to spiral across the face. To get that look on a budget, I always start by mapping out the basic shape with a light hand. Then I use the mechanical pencil to darken the pupil and add tiny strokes around the iris for texture. You can use a regular eraser cut into a wedge shape to lift out highlights, which gives the eye a glassy, alive feel.
Do not feel pressured to buy expensive eraser pencils. A cheap vinyl eraser works fine if you clean it often by rubbing it on a scrap piece of paper. The same technique works for the nose and lips, where the swirling pattern is only partially drawn. Keep the eye area crisp while the abstract patterns around it get looser. That contrast is what makes the before and after effect so dramatic.
Letting Abstract Patterns Take Over: A Low-Cost Approach
Once the core features are established, the fun part begins: letting the swirling wood-grain texture lines spiral across the face. In the photo, you can see how the texture starts near the temple and moves toward the cheek, slowly dissolving the realistic shapes. To do this without expensive blending tools, I rely on repetition and patience. Draw one curved line, then another that follows its shape, and keep going until you create a flow that feels organic.
A budget-friendly trick is to use a piece of cardboard as a drawing board. It is free from any shipping box and gives you a stable surface. Then, lean into the asymmetry. The portrait does not have to be perfectly symmetrical for the texture drawing to work. In fact, the partial features look more dynamic when the abstract patterns take over on one side while the other side stays recognizable. That is the transformation that makes this piece interesting.
Using Your Hand as a Reference: Nail Polish and Pencil Grip Tips
Take a look at the bottom right corner of the photo. A hand with white nail polish is holding the light blue mechanical pencil. That hand is real, and it is a reminder that you can use your own hand as a reference for drawing hands in your portrait art. White nail polish is a simple detail that adds a personal touch, and it costs almost nothing to try yourself. I paint my nails before a long drawing session because it helps me see the hand’s shape better when I photograph my progress.
Your pencil grip matters more for control than you might think. Hold the pencil closer to the tip for detailed work like the eyelashes, and farther back for the looser, flowing swirls. If your hand gets tired, take a break and stretch. Working on a drawing like this can take several hours spread over days, and keeping your hand relaxed prevents smudging and frustration. The white nail polish in the photo is just a fun cosmetic choice, but it also contrasts nicely with the graphite, making the hand a compositional element in the art progress shot.
The Before and After Effect on a Budget
One of the most satisfying parts of sharing pencil drawing progress online is watching people react to the transformation. The swirling wood-grain texture lines make the portrait look like it is shifting from realistic to abstract right in front of your eyes. To create that effect without spending money on fancy canvases, use a mid-tone gray paper. Gray paper is cheap and allows you to use white charcoal or chalk for highlights, which instantly gives the portrait a dramatic before and after feel. If you only have white paper, you can lightly shade the whole background with a soft pencil to mimic that gray surface.
I actually prefer starting on white paper because it is the most affordable option. Then I add the highlights by using a kneaded eraser to pull out the graphite, revealing the white paper underneath. This method costs nothing extra and creates a similar high-contrast effect. The intense eye stays grounded while the abstract patterns take over, and the composite result looks like a professional piece.
Conclusion
Pencil drawing progress does not have to come with a big price tag. With a simple mechanical pencil, a few graphite sticks, and some patience, you can create swirling wood-grain texture lines that spiral across a face and transform a realistic portrait into something abstract and memorable. The hand with white nail polish holding that light blue pencil is proof that you do not need a studio full of gear, just the willingness to try. I hope this budget-friendly breakdown helps you start your own texture drawing journey. If you give it a shot, I would love to see your version. Share your progress or ask questions in the comments below, and keep drawing!
#pencilart #drawingprocess #texturedrawing #portraitdrawing #artprogress
Leave a Comment