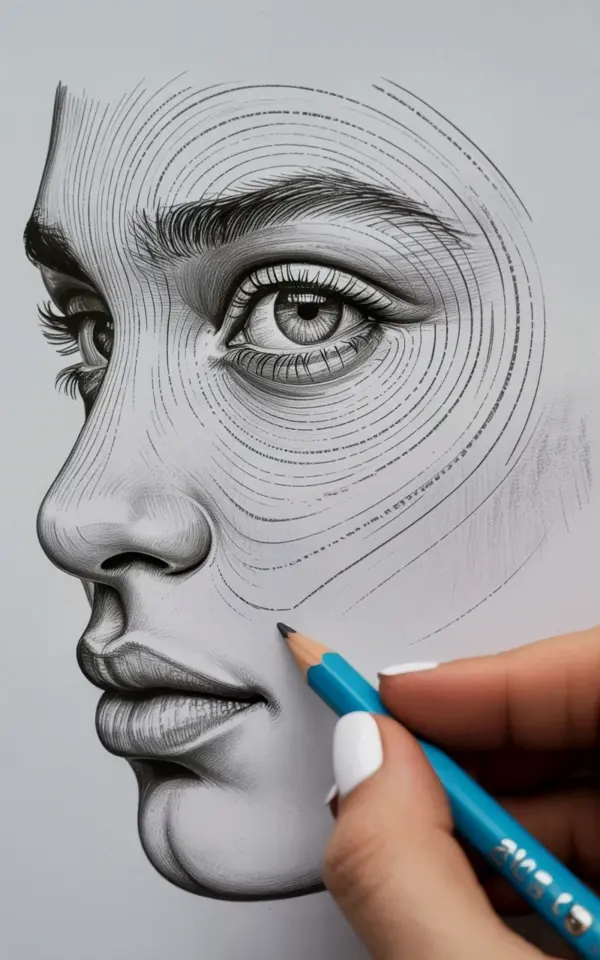
Look at the hands in the frame for a second. There is a light blue mechanical pencil hovering over a portrait that is slowly being consumed by swirling wood grain lines, and honestly, it is hypnotizing to watch. This is the kind of pencil drawing texture idea that looks like it took hours of complicated planning, but it’s really just one repetitive motion done with patience. The spiral lines are everywhere, curving around the contour of the cheek, sweeping over the lips, and wrapping around the nose, but that eye stays laser sharp. The contrast between meticulous realism and loose, chaotic flow is what makes the whole piece feel alive. If you have ever wanted to try pencil drawing texture ideas like this, but felt the result looked messy or forced, then you are in the right place. This article is essentially a tour of the mistakes that ruin this style, and how to dodge them.
I have spent way too many nights hunched over a sketchpad, constantly erasing and re-drawing the same set of lines. Over time, I realized that the specific texture of the spiral is only half the game. The other half is knowing what to leave loose, and what to anchor down. The photo of this portrait is a perfect case study, because the nose and lips are barely defined, just suggestions of form made from curving graphite. Yet, the realism of the eye grounds the entire piece, so the viewer never gets lost. Getting that balance right is easier said than done.
Spiral Portrait Drawing Mistakes: Why Your Texture Looks Like a Mess
Let’s get one thing out of the way: the most common mistake with spiral texture drawing is that people spiral the entire face with zero variation. It turns into a chaotic scribble that hurts the eyes. The wood grain effect works because it follows the underlying anatomy, mimicking the contours of the skull, not because it is a random coil in the middle of a forehead.
Instead of tracing the same circle over and over, think about the direction of the lines. On the cheeks, the spirals should feel like they are flowing outward from the cheekbone. On the forehead, they should travel horizontally and curve down toward the temples. In the photo, you can see how the spirals follow the structure of the nose, wrapping around the bridge, which gives it a subtle 3D illusion without any hard shading.
Honestly, it is a meditative process. You have to trust that the eye will do the heavy lifting, and let the texture just fill the rest of the space like water filling a glass.
Mechanical Pencil Art Tips: Why the Blue Pencil Is Your Best Friend
Switching to a light blue mechanical pencil is a game changer that I wish I had discovered earlier, purely for the aesthetics. They are usually marketed for non-reproducible sketches, so you can draft without worrying about the lines showing up in a final scan. But in this context, the blue pencil is the star, not a hidden utility.
Working in blue immediately kills the harshness of standard graphite. Traditional dark gray lines can feel heavy and suffocating when you are layering a dense pattern like spirals. The blue ink lightens the psychological weight of the drawing, making it feel airier and more fluid. It allowed the artist in the photo to experiment with the texture without committing to a heavy, dark web of lines. Plus, the lead flows like a dream, which is essential when you are trying to maintain that continuous spiral motion.
Need to know what to look for in a pencil? Here is a quick hitlist I use when picking my tools for texture work:
- Lead grade: B or 2B is soft enough to deposit a nice amount of pigment, but not so soft that it smudges the moment your hand passes over it.
- Grip texture: A knurled metal grip helps if your hand gets sweaty during long drawing sessions. Nobody likes a slippery pencil.
- Lead size: 0.5mm or 0.7mm. The thicker 0.7mm is actually better for spirals because it doesn’t break as easily when you are applying pressure mid-swoop.
- Color choice: Light blue specifically. Sky blue or even a cerulean tone creates that gorgeous contrast with white paper, giving the drawing that crisp, fresh look.
How to Draw Texture Patterns Without Ruining the Portrait Vibe
The biggest misconception is that texture equals detail. You can draw texture patterns that are broad and expressive without rendering every pore of the skin. The spiral is a perfect example of this. Instead of drawing skin texture, you are drawing a pattern that is layered on top of the skin, but the way it curves forces the viewer’s brain to interpret it as volume.
Look at the nose in the reference image again. If the artist had outlined the nose with a hard line, the whole effect would have collapsed. The nose exists because of the negative space, and the way the spirals stop or change direction. Keep your linework continuous. Don’t stop and start a million times, because that breaks the rhythm.
Try breathing with the spiral. Inhale as you go around the loop, exhale as you move to the next loop. It sounds stupid, but it keeps your hand from tensing up. A tense hand creates jittery lines.
Portrait Drawing in Progress: The Focal Point Responsibility
When you decide to use abstract textures on a realistic portrait, you need to be extremely selective about what stays realistic. If every part of the face is a swirly mess, then nobody knows where to look. The eye is the anchor. It has to be crystal clear, detailed, and rendered with absolute concentration.
In this specific drawing, the eye is sharp, the eyelashes are individually drawn, and the iris has that slight reflection that brings it to life. That realism does not just look pretty; it grounds the entire surreal concept. The viewer sees the chaos of the spirals, then locks onto the eye, and instantly, the image makes sense. It is a human face, and it is being deconstructed right in front of you.
Also, a practical note: draw the eye before you start the spirals. If you leave the most important detail for last, you run the risk of your spirals dictating where the eye should be, rather than the eye breaking up the flow of the spirals.
Sketching with Spiral Lines and Wood Grain Effects
The wood grain effect in the picture is not something you paint on top; it emerges from the repetition of lines. To get that flow, you have to curve the spirals in a way that mimics the rings of a tree. These rings are rarely perfect circles. They are stretched, pinched, and broken.
Vary the size of your spirals. Use a tiny spiral near the corner of the mouth, and a giant, sweeping spiral over the forehead. This created that dynamic, flowy feeling. If you use one uniform size, the drawing flattens out and looks like a wallpaper pattern rather than a portrait. When you look at the photo, the spirals are almost like topographic maps of the face.
Switch up your motion, too. Sometimes, I will draw the spiral outward from a center point. Other times, I will draw it inward, like I am chasing myself. It keeps the texture organic, and it also keeps your brain interested. If you don’t vary the sizes and directions, you will get bored in ten minutes and abandon the drawing. That seems like a waste of good paper.
Mechanical Pencil Techniques for Continuous Line Art
Mechanical pencils are notorious for snapping lead if you press too hard, which creates those annoying little micro dots that ruin the flow. Avoid the pressure game. The spiral texture does not need heavy pressure; it needs consistency. Hold the pencil loosely, near the middle of the barrel, so you are drawing with your whole arm instead of just your wrist. This is literally a sketching with spiral lines tutorial in one sentence.
Let the spiral lines overlap occasionally. Don’t stress about keeping every line perfectly separate. The spaces between the lines are just as important as the lines themselves. If the texture gets too dense, the drawing loses all its air. The reason the blue pencil works so well here is that it allows for dense layering without the page turning into a black hole. It keeps the energy light, even when the pattern is complex.
When you hit the jawline, treat it as a border. The spirals can flow off the face and into the background, but if you want a clean edge, you have to consciously stop the line or let it fade out by lifting the pencil gradually.
Creative Portrait Ideas: Injecting Wood Texture into Faces
Why do we even like this weird texture so much? It’s inherently organic, human, and nostalgic. Wood grain carries a sense of warmth, growth, and history. Applying it to a face creates a narrative about aging, layers, or even just the beauty of imperfection. It is one of those creative portrait ideas that feels like a hidden message.
You can push the effect even further by adding a bit of graphite shading around the edges of the face to deepen the contrast. Use a blending stump or a tissue to smudge a soft shadow on the side of the temple, and then let the spirals break through that shadow. This is what separates a flat drawing from a dimensional one.
The nose and lips in the reference are rough, but they are not wrong. They are half-suggested, ghost-like shapes that let the viewer’s imagination fill in the blanks. Do not be afraid to leave things unfinished. Sometimes, the most expressive part of a drawing is the part you choose not to define.
To get this texture right, you’re going to have to forget about the final outcome and enjoy the motion. Put on some music, get your light blue mechanical pencil, and just start spinning. If you mess up, keep going. Nothing in the spiral is permanent, many of us sketch over a mistake with an even bigger spiral and call it a design choice.
If you are looking for a project to try tonight, start with a reference photo of a simple face. Use a regular pencil to sketch the eye and the basic silhouette. Then switch to that blue lead and let the spirals flow across the face like they own it. When you are done, you’ll have a piece that looks complicated to everyone else, but felt like a meditation to you.
Leave a Comment