Why Loose Hatching Works So Well for Mountain Sketches
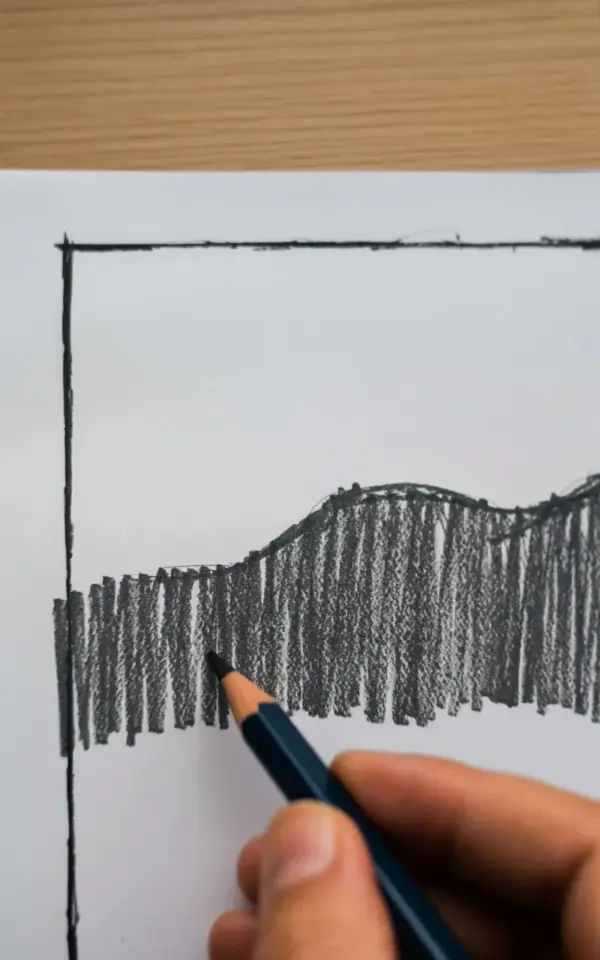
There is something about a pencil sketch mountains scene that feels honest and alive, especially when you let your hand move freely instead of obsessing over every line. In the photo that inspired this post, you can see the bottom portion of my drawing where the dark gray mountain range is built entirely with loose, sketchy hatching lines. The pencil is still in my hand, resting on a light wooden table with visible grain, and the whole drawing sits inside a simple black rectangle. That close up view shows exactly why I love this approach: the hatching looks expressive rather than stiff, and the paper white peeks through to create texture without extra work. For a budget conscious artist, this is a huge win because you do not need fancy tools or expensive paper to get that effect. All you need is a standard pencil, a cheap sketchbook, and the willingness to let go of perfection.
Start with the Darkest Shadows: A Simple Trick for Depth
One of the fastest ways to make a mountain sketch look dimensional is to start with the darkest shadows first. Instead of lightly outlining the entire peak and then trying to darken it later, go straight for the deep tones right at the base or in the crevices. In the photo, those dark gray areas at the bottom of the mountains are where I pressed hardest with the pencil, letting the graphite build up in dense, overlapping crosshatches. That early decision creates immediate contrast against the lighter paper, and it makes the whole drawing feel grounded. If you are working on a budget, this technique also saves lead and paper because you are not wasting time on unnecessary light layers that you will just have to cover up later.
Budget Friendly Materials That Still Look Professional
You do not need a fancy art store haul to create a loose mountain landscape that looks good. In the photo, I used a standard wooden pencil (the kind you can buy in a pack of twelve for a few dollars) on ordinary white sketch paper. The black border around the drawing was drawn with a simple fine liner pen, also cheap. Here is a list of materials that will not break the bank but will give you great results:
- HB or 2B pencil for lighter hatching and outlines
- 4B or 6B pencil for the darkest shadows and deep contrast
- A spiral bound sketchbook with medium tooth paper (brand does not matter)
- A plastic eraser for cleaning up edges or lifting highlights
- A black ballpoint or fine liner pen for borders or accent lines
That is literally all you need. No expensive charcoal sticks, no blending stumps, no fancy brushes. Just graphite, paper, and your hand. The close up in the photo shows that the texture of the wood grain under the paper does not affect the drawing at all, so even a cheap desk or table works fine as a surface.
How to Let the Paper Show Through for Natural Texture
One of the biggest secrets to making a crosshatched mountain sketch look loose and natural is to avoid covering every millimeter of paper. In the photo, you can see white gaps between the hatching lines, especially in the lighter midtones near the top of the visible mountain range. Those gaps are not mistakes; they are intentional. They let the bright paper act as a highlight, giving the graphite a breathable quality that solid shading cannot replicate. To achieve this on a budget, use a pencil with a slightly blunted tip rather than a super sharp point. A blunted lead lays down wider strokes and leaves more paper showing through, which mimics the look of expensive textured paper without actually needing it. Practice making short, angled hatches that cross each other at different directions, and do not be afraid to leave large areas of paper completely untouched.
Close Up Look at My Pencil Sketch Mountains Process
Let me walk you through the exact steps I took for the drawing visible in the photo, since the close up view makes the process easy to follow. First, I drew the black rectangular border with a fine liner to contain the scene. Then I took a 4B pencil and started placing the darkest shadow areas at the bottom and along the lower slopes of the mountains. I used broad, diagonal crosshatches that overlapped in a few spots to build up density. After that, I switched to a 2B pencil for the midtones, using lighter, more spaced out hatches that let the paper show through. The pencil in the photo is positioned right at the edge of that dark area, which is where I was working on the deepest shadows before moving upward. I did not erase anything because loose hatching forgives mistakes easily; if a line goes too far, I just hatch over it or turn it into a rock crevice. The whole drawing took about fifteen minutes, and it cost me nothing but time and a few cents worth of graphite.
Using a Simple Black Border to Frame Your Drawing
That black rectangle around the sketch in the photo is a tiny detail that makes a big difference. It gives the loose, messy crosshatching a container, so the drawing feels finished rather than like a random scribble. On a budget, you can draw this border with any pen you already own, even a cheap ballpoint works fine. I like to use a fine liner with a 0.5 or 0.7 tip because it creates a clean, consistent line. The border also helps you judge proportions and scale. When you draw the mountains inside a defined rectangle, you naturally fill the space without making the scene feel too small or too cramped. In the close up, you can see that the border is not perfectly straight either, but that only adds to the loose, hand drawn charm. Do not stress over getting it exact; a slightly wobbly border looks human and intentional.
Practice Tips for Sketching Mountains with Crosshatching
If you want to try this style yourself, start with a small square of paper and a single pencil. Do not worry about drawing the whole mountain range at once. Focus on a cluster of hatching lines that represent one shadow shape, then add another shape next to it. Over time, the peaks will emerge naturally. Here are a few practical tips from my own practice:
- Hold the pencil near the middle for loose, light strokes, or near the tip for more control in dark areas.
- Work from dark to light, not the other way around. It is easier to add lighter hatches over dark ones than to darken light lines evenly.
- Rotate your paper as you work so the angle of your crosshatches stays comfortable and varied.
- Look at the photo of my drawing and notice how the hatching changes direction between the dark bottom and the lighter peak. That directional shift creates the illusion of slope and depth.
- Give yourself permission to make messy marks. The most expressive sketches are the ones that look like they were drawn quickly and without fear.
Remember, the goal is not photorealism. It is about capturing the feel of a mountain with a few confident scratches of graphite. The pencil in the photo is still wrapped in wood, still ordinary, but it produced something that feels alive because of the way it was moved, not because of its brand or price.
Conclusion: Grab a Pencil and Try It Today
Loose crosshatching turns a simple pencil sketch mountains scene into something that feels both raw and refined. The close up photo shows exactly how affordable and accessible this technique can be. You already have a pencil and paper somewhere in your home. Draw a rough rectangle, place the darkest shadows at the bottom, and let the hatching guide you upward. Watch how the paper texture adds character for free. If you give it a try, I would love to hear how it goes. Drop a comment about your experience or share your own close up sketch. The only thing you need to start is the courage to make imperfect lines on purpose.
#pencilsketch #mountaindrawing #landscapedrawing #sketchingtips #hatching
Leave a Comment