Why This Porsche 911 GT3 RS Drawing Tutorial Actually Works
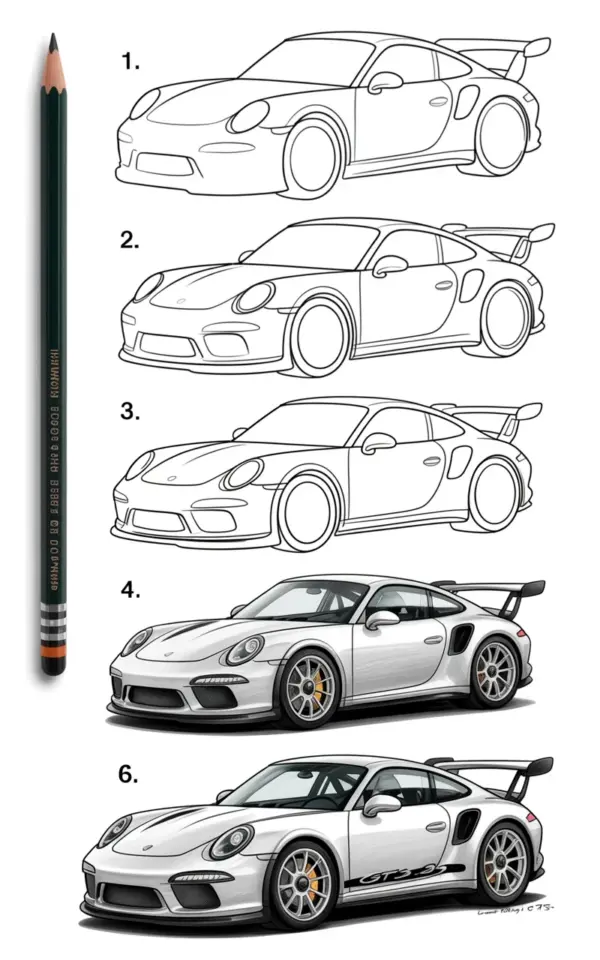
If you are looking for a Porsche 911 GT3 RS drawing tutorial that doesn’t skip the messy middle, you have found the right one. The image shows six clear stages, arranged vertically with a graphite pencil resting on the left side. It starts with a boxy shape that looks nothing like a sports car, then slowly turns into a fully shaded rendering. This is the kind of progression that helps you see exactly where each line comes from. No magic, just repeatable steps.
Most tutorials jump from a blank page to a polished result in two steps. That is not how drawing works. Here, you get the raw scaffolding, the awkward teenage phase of the sketch, and finally the clean finish. The photo captures stage one as a simple rectangular block with four circles for wheels. That is where we begin.
Stage 1: The Boxy Foundation (And Why It Is Not Ugly)
The first stage in the image is a rigid, almost cube-like outline with wheel circles floated underneath. It looks like a toy box on wheels. That is exactly what you want. A common mistake is trying to draw the final curves right away, which throws off proportions. Instead, start with the overall length, height, and wheelbase. The Porsche 911 GT3 RS has a long hood and a sloping rear, but you capture that later.
Use a soft pencil like a 2B. Keep lines light. Check that the wheel circles are the same size and that the gap between them matches the real car’s wheelbase. If you mess up here, every stage after is wasted effort. So spend extra time on this boring rectangle. Trust the process.
- Draw a long rectangle with a slight taper at the rear (future roofline).
- Mark the wheel centers with small crosses. The GT3 RS has a wide stance, so the wheels sit near the edges.
- Add four circles (ovals in perspective) for tires. Make them identical.
- Lightly sketch the ground line so the car sits flat.
The image shows this stage clearly: a block with wheels, no curves, no headlights. That is your anchor.
Stage 2: Shaping the Silhouette – From Box to Bullet
In stage two of the photo, the boxy edges start to disappear. You round the corners, define the roofline, and push the front bumper forward. The Porsche 911 GT3 RS has a distinct teardrop shape when viewed from the side, so focus on the slope from the windshield to the rear spoiler. The image shows the car with more organic body lines, but still no headlights or grille details.
This is where you introduce the wheel arches. They are not perfect half-circles; the rear arches are wider and more squared off on the top. The GT3 RS has huge fender flares, so exaggerate the bulge over each wheel. Use a kneaded eraser to clean up the straight lines from stage one. You should now see a car shaped like a flattened egg on wheels. It is okay if it looks lumpy.
Stage 3: Adding Headlights and Front/Rear Details
By stage three in the tutorial, the drawing gains personality. The image shows the addition of front and rear details including headlights and side vents. The classic 911 round headlights become slightly angular ovals on the GT3 RS, with a light shape inside. Draw them as simple forms first: a tilted oval for the main beam, a smaller one for the indicator.
On the rear, the big fixed wing appears. Do not draw every single strut yet. Just outline the wing’s top plane and the vertical supports. The side air intakes behind the rear windows also start to show up as dark slivers. This stage is about feature placement. The car should now be recognizable as a Porsche, but still flat like a coloring book.
Check that the front overhang is shorter than the rear. The GT3 RS has a very short nose. If your front wheels look too far back, push the bumper line forward.
Stage 4: Refining Body Lines and Surface Changes
Now things get interesting. Stage four (visible in the image as the fourth drawing from the top) shows sharper crease lines along the doors and the front hood. The Porsche 911 GT3 RS has a prominent character line that runs from the front fender, dips down at the door, and rises toward the rear. Trace that line with a medium-hard pencil like an HB. Keep it crisp, not fuzzy.
The side sills also appear, and the wheel spokes start to take shape. The image shows five-spoke wheels typical of the GT3 RS. Draw the rim as a circle, then sketch five lines radiating from the center. Fill the spaces between spokes with darker graphite to create depth. Do not forget the brake calipers: tiny rectangles behind the spokes.
This stage is where the sketch goes from “car shape” to “car design.” Take your time. Compare your linework with the reference image. If something looks off, erase and redraw. Graphite is forgiving.
Stage 5: Shading for Volume – The Graphite Game
Shading is what turns a line drawing into something that looks three-dimensional. In the photo, stage five is noticeably darker around the wheel wells, under the car, and inside the side intakes. Use a 4B or 6B pencil for shadows. Work in layers: start light, then build up.
The trick is to identify where light hits the top surfaces and where it disappears underneath. The bumper, hood, and roof catch light. The area under the rear wing, the lower doors, and the front splitter are darker. Use a blending stump or a tissue to smooth out the graphite. Do not smear it with your finger; that leaves oil and makes a mess.
Reflectors and window glass need contrast. Make the rear quarter glass dark but leave a thin white highlight along the top edge. The headlights should have a bright spot (a reflection) and a dark core. The image shows this clearly: the final two stages have much richer black-and-white contrast than the early ones.
Stage 6: Final Details – From Sketch to Realistic Finish
The last drawing in the vertical sequence is the finished version. Every surface has texture. The front Porsche emblem appears as a tiny abstract shape. The exhaust tips are dark circles at the rear. The wheel spokes have highlights on their outer edges. The overall effect is a car that looks like it could drive off the page.
For the final push, add small touches: the fuel cap on the front left fender, the “GT3 RS” badge as a thin rectangle, and the black plastic trim around the intakes. Use a sharp pencil (2H) for these fine lines. Then darken the ground shadow below the car to anchor it.
If you want a realistic finish, do not overblend. Leave some pencil strokes visible in the shaded areas to suggest natural graphite texture. The image example shows a good balance of smooth shading and crisp edges. Compare your stage six to the photo. If it looks close, you are done. If not, adjust the contrast.
This tutorial works because it breaks down a complex shape into six distinct tasks. The vertical layout in the photo makes it easy to track your progress. You are not judging your drawing against a finished version until you reach the final stage. That saves a lot of frustration.
Now grab your pencil and sketch pad. Start with that boxy rectangle. See how far you can get through the six stages. And if you finish, share your drawing with someone who also loves automotive art. Practice is the only secret, and this method gives you a clear roadmap.
#PorscheDrawing #CarSketch #StepByStepDrawing #PencilArt #AutomotiveArt
Leave a Comment