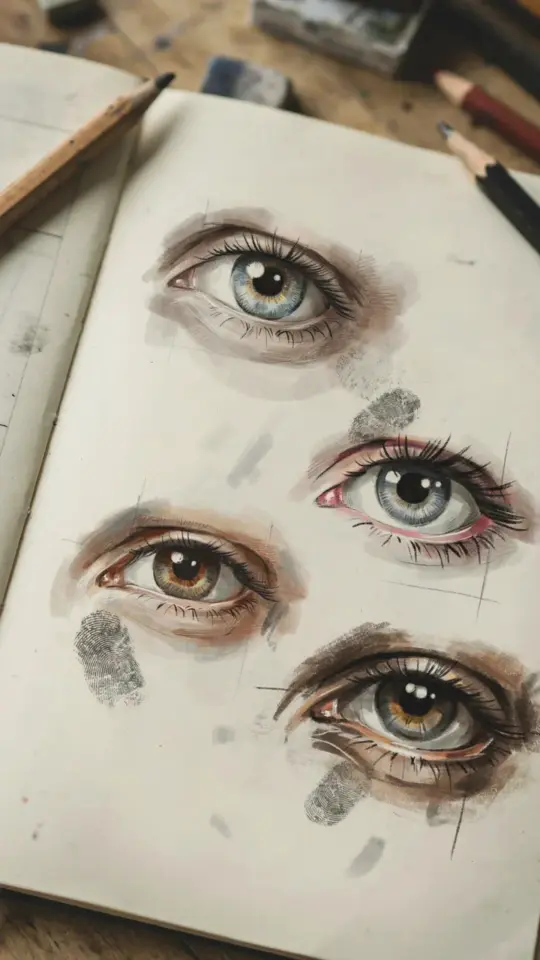
The Most Common Mistakes in Realistic Eye Drawing and How to Fix Them
Starting a realistic eye drawing sketchbook inspo page can feel both exciting and intimidating. When you first lay down charcoal, the eyes often end up looking flat, lifeless, or oddly cartoonish. This is not because you lack talent. It is because certain mistakes show up again and again for beginners. I have made every single one of them myself. The good news is that once you know what to watch for, your eye sketches will improve quickly. This article walks through the five most frequent errors in realistic eye drawing and gives you simple, practical fixes. Grab your sketchbook, and let us look at what usually goes wrong.
Mistake 1: Getting the Eye Shape Wrong from the Start
The shape of the eye is more complex than most beginners think. Many people draw an almond shape that is too symmetrical or too pointed. Real eyes have a distinct curve: the upper lid usually arches more than the lower lid, and the inner corner (the caruncle) is lower than the outer corner. If you skip this observation, your realistic eye drawing will look like a generic icon, not a real person.
To avoid this, start with very light construction lines. Draw a horizontal guideline for the angle of the eye. Then mark where the outer and inner corners fall. Compare the height of each corner. The inner corner is often slightly lower and more rounded. Sketch the upper lid as a gentle curve that peaks nearer to the inner side, not the middle. Fixing this one shape issue will immediately make your sketchbook inspo pages feel more alive.
Mistake 2: Ignoring the Tear Duct and Inner Corner Details
Beginners often forget the small pinkish tear duct at the inner corner. They also miss the subtle shadows inside that area. Without these details, the eye looks incomplete. The inner corner contains a tiny curved shape and a small dark shadow where the lids meet. This area catches light and gives the eye structure.
In your charcoal art ideas, treat the tear duct as an important sculptural feature. Use a sharp charcoal pencil to define its curved edge. Leave a tiny white highlight on the wet part (the caruncle) to suggest moisture. Then softly darken the crease that wraps around the corner. This single addition makes your drawing believable.
Mistake 3: Using the Wrong Tonal Values for the Iris and Pupil
Many beginners shade the entire iris with a uniform dark gray and leave the pupil pure black. In reality, the iris has a range of tones and often a visible radial texture. The pupil is not completely black either; it reflects a small catchlight from the environment. Your realistic eye drawing needs these subtle shifts to avoid looking like a glass marble.
Here is a practical exercise for your drawing tutorial practice:
- Start with a mid-tone base. Use a soft charcoal stick to fill the iris with a light gray. Do not press hard.
- Add darker rings. Draw a slightly darker ring around the pupil and a thin darker line at the outer edge of the iris.
- Create radial lines. Use a sharp charcoal pencil to pull short strokes outward from the pupil toward the edge. This mimics the fibers of the iris.
- Leave the catchlight white. Erase a small crescent or circle near the top of the iris to represent the light source. Keep it crisp.
- Darken the pupil. The pupil should be very dark but still allow a tiny reflection of the catchlight if it falls there.
When you get these values right, the eye will appear to look back at you.
Mistake 4: Overblending the Charcoal Until Everything Looks Fuzzy
Blending is useful, but overdoing it destroys the sharp edges that make an eye look realistic. Beginners often rub the charcoal too much with their fingers or a blending stump, turning edges into soft smudges. You lose the crisp line of the eyelid, the sharp corner of the tear duct, and the hard edge of the eyelashes.
For clean charcoal art, blend only in areas that naturally have soft transitions, like the shadow under the upper lid or the gradient on the eyeball. Leave edges crisp where two distinct forms meet. Use a kneaded eraser to pull back highlights and clean up ragged edges. If you find yourself blending everything, stop and ask: does this area need a hard edge or a soft edge? Answer that before you touch the blending tool.
Mistake 5: Drawing Eyelashes as Uniform Sticks
Eyelashes are often drawn as a row of identical black lines that curve the same way. Real lashes grow in clumps, vary in length and thickness, and curve in slightly different directions. They also cast shadows onto the eyeball. If you treat them as a single curved line, your eye sketch will look like a cartoon.
To improve your eyelashes in any eye sketch, follow these points:
- Draw them in small groups, not singly. Observe how your own lashes clump
#RealisticEyeDrawing #SketchbookInspo #CharcoalArt #DrawingTutorial #EyeSketch
Leave a Comment