Find Your Light Source First
Look at your reference photo and squint. The first thing you should notice is not the iris or the eyelashes, it’s the bright spot bouncing off the wet surface of the eye. That spot tells you exactly where the light is coming from. A realistic eye drawing lives or dies by that highlight, so mark it before you shade anything else. Use a tiny dot or a broken outline with your pencil, just enough to remember its shape.
Here’s the thing: the highlight is almost never a perfect circle. In real eyes, it’s often a rectangle from a window, a squiggly line from a lamp, or a soft blob. So trace the actual shape you see, not the one you think should be there. And if you’re working from memory, pick a light source and stick to it. Otherwise your lens will look like a disco ball.
The Cheapest Pencil Setup That Still Works
You don’t need a $40 graphite set to get a good lens shading. Honestly, a classic HB pencil from the drugstore will carry you far. But if you want a little range, here’s the no-fuss list I give to friends who ask me how to start pencil art on a budget:
- One HB pencil and one softer pencil like a 2B or 4B. That’s a solid starting pair.
- A kneaded eraser. It costs about a dollar, and it lifts graphite instead of smearing it.
- A piece of regular printer paper. Thick paper is nice, but not required.
- Your finger or a tissue for blending. You read that right, no fancy stumps needed.
I still use a kneaded eraser I bought in 2011. It looks like a gray booger at this point, but it picks up graphite exactly the way I want. My favorite pencil is a random HB with a bite mark on the end, probably from my dog. It works fine. So ignore the people who say you need professional supplies. You need a pencil and a light source.
Map the Cornea Before You Shade
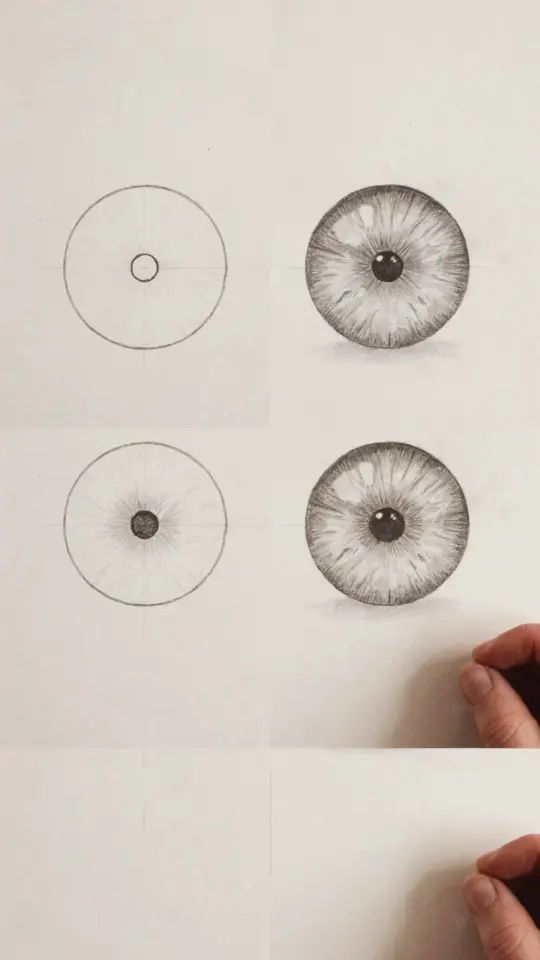
The eye lens is not a flat sticker sitting on the eyeball. It has a curved, slightly bulging shape, and that curvature affects how the shading falls. Before you start adding gray tones, draw the outline of the lens, the iris, and the pupil with very light strokes. Make sure the pupil sits inside the iris, not on top of it, and leave a tiny gap for the reflection.
Take a second to notice the outer edge of the iris. It’s not a sharp line; it’s a softer transition where the iris meets the white of the eye. If you outline it too dark, your realistic drawing instantly looks like a cartoon. So map it lightly, almost like you’re just guessing where everything goes. You’ll fix the shape later, but this guide gives you a roadmap.
Layer Soft Reflections on the Cornea
Now that the basic map is down, you can start building the reflective nature of the lens. First, use your finger or a tissue to smear a very light layer of graphite over the iris and pupil area. This base gives the eye that glossy, wet look. Without it, the eye can seem dry and empty. Keep the pressure light, you can always add more, but you can’t easily take away a heavy smear.
Once the base is down, take your kneaded eraser and gently press it into the highlight shape you marked earlier. That pulls the graphite off and leaves a clean, bright reflection. Don’t rub, just dab. And don’t worry if the highlight looks too big right away. You can refine it later by adding darker tone around it. The reflection is your best friend because it tells the viewer this is a wet, living eye.
Build Up From Light to Dark in Tiny Circles
Here’s a shading trick that works every time: use tiny circular movements instead of straight back-and-forth lines. Circles let you blend tones gradually, and they make the iris look fibrous and organic. Start with a light touch over the whole iris, then press a little harder near the pupil. The area closest to the pupil is usually the darkest part of the eye.
For the iris lines, look at the reference and follow the thread-like patterns that radiate outward from the pupil. Don’t draw every single one. Just suggest a few with short curved strokes. Then use your finger or tissue to soften them slightly. That combination of sharp lines and blended edges is what makes a pencil art eye look realistic rather than flat.
And here’s a little tangent: I ruined an eye once by drawing iris lines too dark, then trying to erase them. The paper got all fuzzy and I had to start over. So now I always keep the lines lighter than my final goal. You can darken them at the end, but you can’t undarken them. That thought keeps me disciplined.
When to Stop and Call It Done
This is the hardest step in any drawing tutorial, honestly. You’re staring at the eye, and your brain keeps saying one more layer, one more tiny highlight. But overworking an eye is the fastest way to turn it into a muddy mess. Put the pencil down for a minute. Walk across the room and look at the drawing from a distance. Does the eye pop? Does it feel like it’s looking at you? If yes, stop.
Another good trick is to flip the paper upside down. Or hold it up to a mirror. That breaks your brain’s pattern and shows you mistakes you missed. Then make one or two final adjustments, like deepening the dark line under the top eyelid or sharpening the catchlight. Then sign it. You just finished a realistic eye drawing with five dollars worth of supplies and a whole lot of patience.
So grab that pencil and give it a shot. If you want more step by step pencil art guides like this one, save this post for your next cozy sketching night. And hey, I’d love to see how your eye turns out, come find me in the comments or tag me in your progress photo.
Leave a Comment