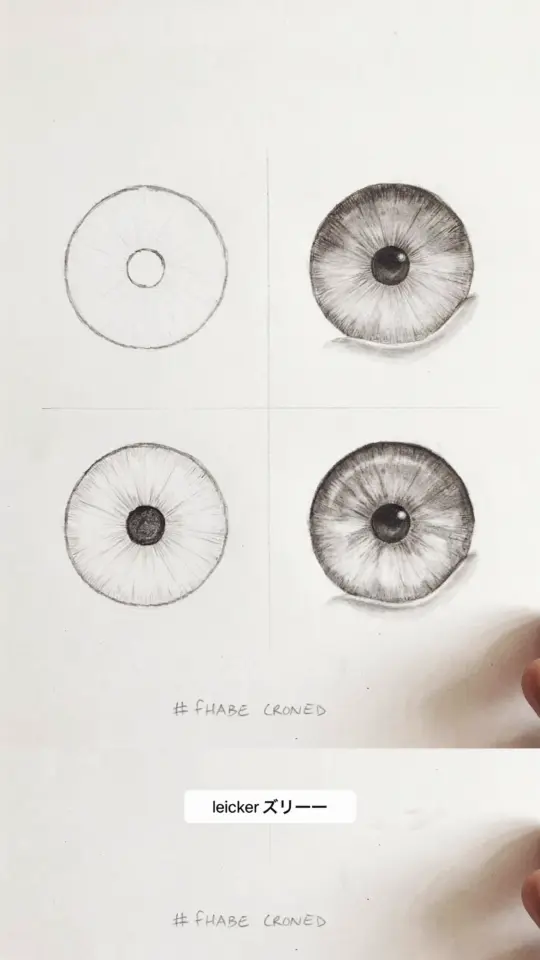
If you have ever tried to sketch a face and ended up frustrated because the eyes looked flat or lifeless, you are not alone. The secret to a realisticEyeDrawing lies in understanding how light hits the curved surface of the eye. Once you learn to map the reflections and build shadows gradually, you can turn a simple pencil sketch into something that actually looks like a living eye. This tutorial is designed for absolute beginners, so I will skip the fancy terminology and show you exactly what to do with your pencil.
Why Start with the Eye Lens? Understanding the Basics
The human eye is basically a wet, shiny sphere set inside a socket. That sphere (the eyeball) has a clear front section called the cornea, and underneath it sits the colored iris and the dark pupil. The outer corner has a tear duct, and the whole thing is framed by eyelids and lashes.
For beginners, the biggest mistake is trying to draw the entire eye shape first. Instead, focus on the lens area where light creates the most contrast. If you get the reflection and the shading of the white part right, the rest of the eye will fall into place naturally. I always tell my students to think of the eye as a marble with a window in the middle.
Step 1: Find Your Light Source First
Before you put pencil to paper, decide where the light is coming from. Is it from above, from the side, or from a window behind you? This single choice determines where your highlights and shadows go.
If the light is from the top left, for example, the highlight on the eye will be in the upper left area of the cornea. The shadow will fall on the bottom right side of the eyeball. Without a fixed light source, your drawing will look confusing. I like to draw a tiny arrow in the corner of my sketch to remind myself where the light hits.
- Top light: highlight sits near the top of the eye, shadow falls under the upper eyelid.
- Side light: highlight is on the side closest to the light, and the opposite side gets darker.
- Direct front light: highlight sits right on the center of the cornea, but this creates a flat look. Beginners should avoid it.
Step 2: Sketching the Reflection on the Cornea
Now draw the basic almond shape of the eye lightly with an HB pencil. Inside that shape, mark a small circle or oval for the main highlight. This reflection is not a random dot; it is the shape of your light source. If you are drawing by a window, the reflection might look like a rectangle. If you use a desk lamp, it might be a circle.
I recommend outlining the reflection very faintly. Do not fill it with white at first. Leave it as pure white paper. Then sketch the iris and pupil inside the rest of the eye. The reflection overlaps them, so some of your iris shading will stop at the edge of that highlight. This is the trick that makes the eye look glossy and wet.
Step 3: Building Depth with Pencil Shading Techniques
Once your reflection and basic shapes are in place, start shading the white part of the eyeball. Use a soft pencil like a 2B and work in layers. Begin with a light gray tone across the entire sclera (the white part), except the reflection area. Then gradually darken the corners and the area near the tear duct.
For the iris, use short radial strokes that start at the pupil and move outward like spokes on a wheel. The iris is not a flat disk; it has texture. Press harder near the pupil and lighter toward the outer edge. This creates depth. The darkest area in the eye is usually the rim where the iris meets the pupil. Do not outline it with a hard line; let it blend softly.
A simple shading tip: hold your pencil at a low angle and use the side of the lead rather than the tip. This gives you a softer, more controllable mark that is easier to blend with your finger or a tissue.
Common Mistakes Beginners Make (and How to Fix Them)
I have seen the same patterns in every beginner class. Here are the top three issues and exactly how to correct them:
- The highlight is too small or too white: Beginners often draw a tiny dot for the reflection. Instead, make it bigger than you think. A large highlight feels more natural. And never shade over it. If you accidentally do, erase gently with a kneaded eraser.
- The pupil looks like a black hole: The pupil is dark but not absolute black. Leave a tiny white spot inside it for a secondary reflection. Also, the edge of the pupil should bleed slightly into the iris, not be a harsh circle.
- The eye looks flat because all the shading is the same value:#realisticEyeDrawing #pencilArtTutorial #eyeDrawingTutorial #pencilShading #drawingTips
Leave a Comment