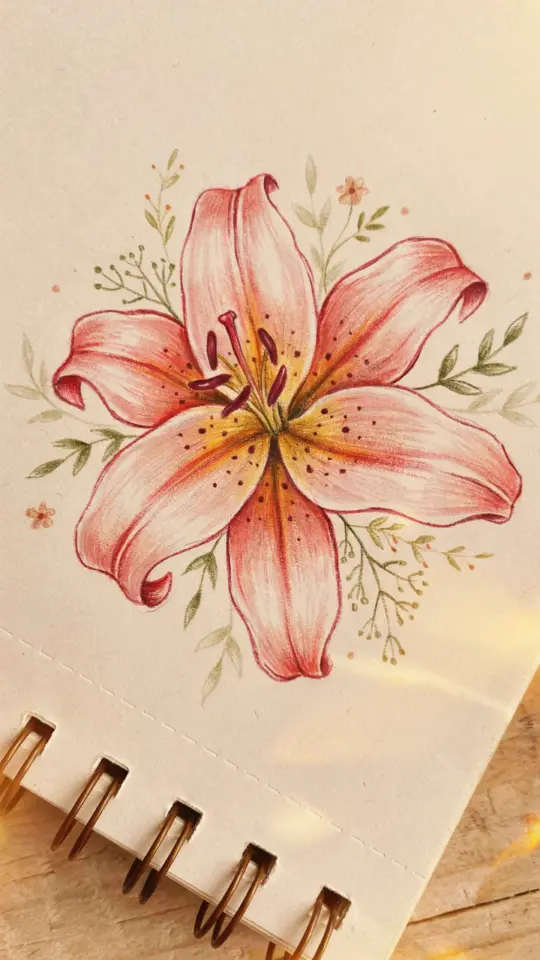
The Petal Problem: Why Your Lily Looks Like Cardboard
I still remember the exact sketchbook page where I gave up on lilies for the first time. I’d drawn the center, counted out six petals, and carefully traced each one like a teardrop that got stretched too wide. It sat there on the paper, perfectly symmetrical, utterly dead. The whole drawing looked like a botanical diagram that had been ironed flat. And that’s precisely the issue that trips up almost everyone who tries a lily drawing: we treat each petal as a flat, stiff shape instead of a living, twisting form.
Honestly, it took me years and about fifty crumpled attempts to see what I was doing wrong. The reference photo showed light catching the curves, petals folding over each other like hands clasped in prayer. My drawing showed none of that. Lilies are not flat. They twist, they overlap, and they have these dramatic folds that catch shadow. The kindest thing you can do for your art is to stop drawing the lily and start drawing the motion of the lily.
Why Your Flower Drawing Looks Stiff and Static
Here’s the thing about realism in a flower drawing: it’s not about perfect shape, it’s about believable volume. When you look at a real lily, the petals aren’t lying flush against the page. They bow backward, they curl at the tips, and the edges occasionally hide behind their neighbors. If you draw every petal as a separate, complete shape with a clean outline, you remove all of that depth.
Think about it this way: a professional illustrator once told me that a drawing is just a lie that convincingly describes a 3D object on a 2D surface. If you never show where one petal tucks behind another, the eye has no reason to believe anything exists behind that flat outline. Look closely at your own hand for a second. See how the fingers overlap and cast shadows, how the creases deepen? Now look at your reference photo of a lily. Notice how the center of the flower is actually a dark cave, not a flat landing pad.
Start with the Direction of the Folds, Not the Outline
Ok so, the absolute game-changer for me was ignoring the outer edge of the flower entirely at the start. Instead of sketching the silhouette, I studied the folds. I would take my pencil and draw the flowing lines that the petals made as they curved inward and outward. Just a few swooping strokes. No outlines. Nothing closed off. It feels weird, but those swooshes tell you more about the flower’s structure than any contour ever will.
I call this the “ribbon method.” Imagine each petal is a silk ribbon that’s been curled. The lines that follow the curve of the ribbon are the lines you want to put down first. Once you have the flow, you can place the edges along those lines, breaking them where they tuck behind another ribbon. This simple shift changed my flower drawing from something that looked pressed in a book to something that looked like it might move in a breeze.
The Overlap Trick for Natural Lily Petals
To get that natural overlap, you have to be a little bit ruthless about one thing: let the lines get lost. A petal that disappears behind another petal and then reappears on the other side is what sells the depth. If you trace a continuous line around every petal, you are actively killing the illusion.
Instead, try this approach in your sketchbook:
- Draw the petal that sits at the very back first, but stop your line right where you think another petal will cross it.
- Draw the next petal over it, letting the edge run smoothly across the previous one.
- Do this for all six petals, building them up like a pile of leaves, one by one.
- Then go back and darken only the lines that sit in the shadows, especially in that deep throat of the flower.
That break in the line is like a visual cue for the brain that says “this is in front.” It telegraphs depth instantly without you having to do heavy shading. I remember sitting in a cafe with my sketchbook, doing this on a tiny napkin, and the owner came over to ask if I was a botanist. I probably looked like one, hunched over and frowning, muttering about overlapping petals.
A Bit of Pink Shading Brings the Lily to Life
Once you have that curved and overlapping line work, the next step is color. Not full paint coverage, just grace. Look, you don’t need to render every single shadow to make a lily look alive. In fact, over-shading is a quick way to muddy the whole thing. What worked for me, and what I keep coming back to, is adding a whisper of pink along the very edges where the petals curl. It’s subtle, but it makes the flower feel like it has blood flowing through it.
Use a soft pink colored pencil or a bit of watercolor wash. Trace the curled edge where the petal folds back on itself. Also, add a slightly darker pink right at the base of the throat where the petals meet. This gives the flower a natural gradient that pulls the eye inward. One tiny tangent: don’t pick a neon pink. Pick something dusty, like a rosewood or a blush. That’s what lilies actually look like, not the synthetic candy pink you see in cheap clipart.
How to Fix a Lily Stem and Leaves That Look Boring
Nobody ever mentions the stem. They are all obsessed with the petals, but a lily on a stem that looks like a stick ruins the whole aesthetic drawing. A lily stem is thick, grooved, and has these gorgeous, sweeping leaves that alternate up the stalk. The leaves are not simple teardrops either. They curve downward and have a dramatic crease down the middle.
When you draw the leaves, treat them like mini versions of the petals. Give the central vein a curve. Let the leaf twist away from the stem. And don’t draw the stem as a straight tube. Give it a slight, graceful bend, like it’s leaning toward the sun. I used to draw stems as rigid lines with two parallel edges. Now I draw a single center line, establish the curve, and then hang the flesh of the stem off that spine. It takes a bit more time, but the result is a thousand times more organic.
A Simple Drawing Exercise to Re-Train Your Eye
If you’re stuck in the flat-petal loop, here’s a practical exercise that broke my habit for good. Grab a pencil and a timer. Spend three minutes just drawing the dark inside of the lily throat. Don’t draw a single petal or a single outline. Just fill in the darkness and the shadows that fall where the petals meet. It forces you to see the negative space and the depths of the flower before you ever touch the tips.
The second part of that exercise is to draw the flower upside down. Flip your reference photo and your sketchbook around. You lose your preconceived notion of what a lily looks like, so you actually start drawing what is physically there. It’s weirdly freeing. Not gonna lie, the first few attempts looked like alien creatures, but the anatomy was suddenly correct because I was paying attention to angles, not symbols.
Just a warning: drawing a lily this way takes patience. You’re not just sketching a pretty picture, you’re problem-solving what goes behind the front layer, how deep the throat goes, and where the stem connects. But by the time you finish the last petal, you’ll have something that actually looks like it could open and close in the morning sun.
Your Sketchbook is the Best Place to Make Mistakes
Every big drawing I’ve ever made started as dozens of bad sketches in cheap notebooks. The pressure to make a perfect flower drawing is what makes you rigid, so take that pressure off. Use the cheap paper, let the lines get messy, and draw the same lily five times if you have to. The fifth one will always beat the first because your hand will have learned something by then.
My own sketchbook is full of lilies that are too tight, too loose, too dark, too pink, and one that looks suspiciously like a rubber glove. But that’s the process. That’s how you find the motion and the curve and the life. So go ahead, grab that reference photo, and give it another try. Start with the seams of the petals, not the silhouettes, and watch how your next lily drawing finally starts to breathe.
Leave a Comment