Why Watercolor Droplets Are Perfect for Beginners (and Your Wallet)
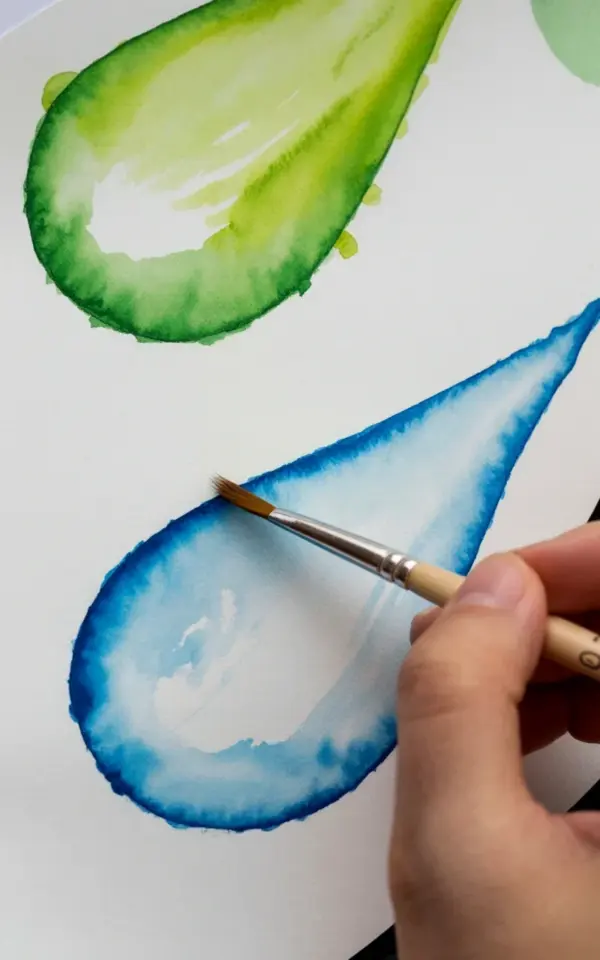
This watercolor droplet tutorial is exactly what you need if you’re itching to paint something that looks impressive without spending a fortune on supplies. I’m showing you a close-up of my hand holding a fine brush touching the blue droplet, while the lime green one up top has those looser, textured strokes. Honestly, droplets are a fantastic entry point because they teach you two critical things at once: how water behaves and how pigment settles. And you don’t need a $100 set of paints to get started. Not gonna lie, my first attempt at a droplet looked like a sad green blob, but that’s the point. You learn by messing up.
Look, you probably already own most of what you need. A cheap palette, a couple of brushes from a discount store, some student-grade paper. That’s it. The photo shows a basic fine brush touching the blue droplet, same kind you can grab for five bucks. The green one has more of a dry-brush texture, which comes from less water on the brush. Simple stuff, really. So let’s break this down without the hype.
Choosing Budget Paper That Won’t Let You Down
You might think paper is where you have to splurge, but nope. Here’s the thing: you can absolutely use cellulose-based watercolor paper for droplet practice. It’s cheap, around $10 for a pad of 12 sheets, and it handles small droplets surprisingly well. The green droplet in the photo has those soft, textured edges because I used slightly drier paint on a cold-pressed cellulose sheet. The paper’s texture grabbed the pigment unevenly, creating that organic look. The blue droplet has smooth edges because I wet the area first and let the paint flow into a controlled puddle. Same paper, different technique.
But honestly, if you can spare an extra five bucks, get a small block of cotton paper. It makes the color lift more cleanly. But don’t stress. I’ve painted entire droplet studies on printer paper (don’t judge, I was broke). It works if you keep the water moderate. Just don’t soak the thing or it’ll turn into a wrinkled mess. Anyway.
How to Control Water and Pigment for Realistic Drops
This is the core of the whole droplet thing, and it’s way simpler than people make it sound. The green droplet in the photo has loose, textured strokes because I loaded the brush with pigment and touched it to dry paper. Little water, lots of paint. The brush dragged across the surface, leaving those rough edges. For the blue one, I first painted a small wet area with clean water, then added a concentrated drop of blue pigment. The water spread the color into a perfectly rounded shape with smooth boundaries. That’s what my brush is doing in the photo: touching the edge of the blue droplet to nudge the pigment into place.
So here’s a practical rule: dry paper = rough, textured, organic. Wet paper = soft, blended, smooth. Want a more defined edge like the blue droplet? Paint the water area first, let it sit for a second, then drop in color. Want the green’s wild look? Skip the water step and just paint directly with a nearly dry brush. That’s the whole secret. I’m not kidding. Two techniques, one subject. And you can practice them with a single tiny brush and a box of cheap paints.
One weird thing I do: I sometimes blow on the droplet while it’s still wet to push the pigment into a little tail. It looks cool, but it’s also a great way to accidentally spray paint all over your table. You’ve been warned.
Painting the Lime Green Droplet with Textured Strokes
Let’s talk about that lime green guy at the top. Notice how it’s not a perfect circle? The brushstrokes are visible, almost like tiny hairs radiating outward. That happens when you use a fine brush (like a size 2 round) and barely wet it. I mixed a vibrant lime green from a cheap tube of sap green plus a touch of lemon yellow. Not gonna lie, I used a brand that cost $1.50 at the craft store. It still works. On dry paper, I touched the brush down and twist-pulled it slightly. The pigment caught on the paper fibers and created that broken, airy texture.
Key tip: don’t try to make it perfect. Let the brush do its own thing. If you overwork it, the texture disappears and you get a flat, dull blob. Stop after three or four strokes. Look at the photo: you can see the paper shows through in spots. That’s deliberate. That’s the whole point. So relax your grip, use a light hand, and let the paint skip across the surface.
Creating Smooth Edges for the Blue Droplet
The blue one at the bottom is the opposite game. I wanted it glassy, with a crisp, clean boundary. You can see my brush gently touching the edge, adding a tiny bit more blue to darken the shadow while the droplet was still damp. The paper was pre-wet with water (a small puddle, about the size of a dime). Then I dropped in a mix of ultramarine and a touch of turquoise. The water acted like a fence, keeping the pigment inside while letting it flow evenly. No strokes visible, just a smooth gradient from dark to light.
Here’s a budget trick: use a water brush instead of a regular brush for the wetting step. Those cheap plastic water brushes (the ones you fill with water) give you a consistent, controlled puddle. You can get a three-pack for under ten bucks. They’re not fancy, but for droplets? They’re perfect. The fine brush in the photo is a regular one, but I used the water brush to lay down the initial wet area. Nobody told me that trick, I figured it out by accident because I was too lazy to find a separate cup of water. Lazy wins sometimes.
Budget Brush Picks That Actually Work for Droplets
- Jumbo round brush (size 6-8) – great for laying down the initial water puddle. The cheap synthetic ones from the dollar store are fine. Just make sure they hold water without dumping it all at once. One of mine unloads like a waterfall, so I reserve it for splatter effects only.
- Fine detail brush (size 0 or 1) – exactly what you see in the photo touching the blue droplet. I got a set of five for $7 on Amazon. They lose a few bristles over time, but honestly, for droplets you’re not doing heavy scrubbing. One brush lasted me six months before the tip curled weirdly.
- Water brush – not a traditional brush, but it’s a lifesaver for beginners. Fill it with water, squeeze gently to wet the paper, then switch to your pigment-loaded brush. You avoid washing out your paint because the water brush only touches clean water. I keep one in my desk drawer for quick practice sessions.
And if you’re really on a shoestring, try using a toothpick for tiny droplets. It’s actually fun. Dip the tip, touch the paper, tiny perfect circle. Not great for larger ones, but you get the point.
Common Beginner Mistakes (and How to Dodge Them)
One mistake everyone makes: too much water. You end up with a flooded mess that bleeds everywhere and dries in weird rings. The green droplet in the photo has almost no water, so it stays put. The blue one has just enough water to spread the color but not so much that it breaks the surface tension. How do you know the right amount? Practice with a single drop on a scrap piece. Add water drop by drop until it stops spreading. That’s the sweet spot. I used a medicine dropper to count water drops when I was learning. Weird, yes. But it worked.
Another goof: using too much paint. The blue droplet has a thin layer because I diluted the pigment first. You can see a lighter highlight on the left side where the paper shines through. That highlight happens naturally if you don’t glop on the paint. If your droplet looks flat and dark, you’re using too much pigment straight from the tube. Thin it down. A tiny dab the size of a peppercorn is enough for a droplet the size of a thumbnail.
And one more: moving the paper too early. I have a habit of lifting and tilting my paper to see the paint run, then I mess up the droplet shape. Let it dry at least 10 minutes before you even breathe near it. Patience is free, use it.
Finishing Thoughts
So that’s the real deal on painting lime green and blue watercolor drops on a budget. The green one with its loose, textured strokes, the blue one with smooth edges, and my hand holding that fine brush in the photo, it’s all about simple control of water and pigment. You don’t need luxury supplies. You need a brush, some paper, and a willingness to make a few ugly blobs before you get the hang of it.
If you found this helpful, save the Pinterest pin, try the technique tonight, and let me know how it goes. I’m curious which style you prefer: messy and organic or smooth and glassy. Drop a comment (pun intended) if you want. Happy painting.
#watercolortutorial #dropletpainting #watercolordrops #watercolorbeginner #paintingtips
Leave a Comment